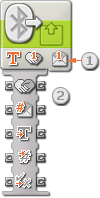
This block allows you to send a wireless message to another NXT.
Configuring the NXT for Wireless Communication
Before wireless messages can be sent or received, the participating NXTs must be set up for wireless communication.
On the (master) NXT that will communicate with other NXTs, navigate to the Bluetooth category and choose Search that will start a search for other devices. When the search is complete, choose which connection number (1, 2, or 3) you want the second (slave) NXT to be known as. The first time a connection is established between two NXTs, a prompt to enter the Passkey will appear on both NXTs; this needs to be accepted by both. Now when you navigate to the Connection category on the master NXT, the slave NXT should be shown by its name occupying the selected connection number. On the slave NXT, the master NXT should be shown occupying connection number 0. At this point, the master NXT is ready to initiate communication with the slave NXT.
If the master NXT needs to communicate with multiple NXTs (up to a maximum of three), you should repeat the above process.
Note! If you have multiple NXT devices talking to each other, and your master NXT is also talking to more than one NXT device, you will need to have at least a one second delay built in to the program to allow the Bluetooth radio to change channels before sending the messages.
It’s only necessary to go through this process on one NXT. The receiving NXT will automatically update its connection when the master NXT is setting up its connection number.
Connection Number
The connection number for each NXT might be considered its address in the wireless world. You send a message to a specific NXT by indicating its connection number.
Mailbox Number
Each NXT has ten mailbox numbers where wireless messages can be deposited. Each mailbox number can hold up to five messages. If the mailbox number fills up with five messages, adding one more message will cause the NXT to erase the oldest message.
Sending a Message
To send a wireless message (after all NXTs have been configured with connection numbers), first select the connection number of the target NXT. Then choose the message format (Text, Number, or Logic). Input the message by typing in some text or a number, or choosing a logical condition (true or false). Finally, choose the mailbox number (where the message will be stored) at the target NXT. The message format and the message itself can also be specified by using input data wires.
![]() Note: see the Receive Message block for information on receiving a wireless message.
Note: see the Receive Message block for information on receiving a wireless message.
Display Settings

- This is the connection number of the target NXT (that is to receive the message).
- The message type and the message itself can be supplied dynamically using input data wires. The output plugs to the right will pass any input information through to other blocks, if necessary. (See the Data Hub section below for more information.)
Configuring the Send Message Block

- Use the radio buttons to choose the connection number of the target NXT.
- The pull-down menu will let you select the message type (Text, Number, or Logic).
- Input the message by typing in some text or a number (if you have chosen Text or Number respectively), or, if sending a Logic message, using the radio buttons to choose true or false.
- Choose the mailbox number at the destination NXT.
Configuring the Send Message block’s Data Hub
You can control the Send Message block dynamically by connecting data wires (from other blocks’ data hubs) to the Send Message block’s data hub.
Open a block’s data hub by clicking the tab at the lower left edge of the block after it has been placed on the work area.

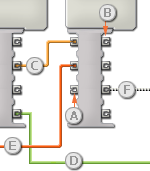
Data wires carrying input information to a block are connected to the plugs on the left side of its data hub. Data wires carrying output information are connected to the plugs on the right side.

[A] Input plug
[B] Output plug
[C] Number data wire (yellow)
[D] Logic data wire (green)
[E] Text data wire (orange)
[F] Broken data wire (gray)
Passing data from the input plug to the output plug
If an input plug has a corresponding output plug (see A above), the input data will pass through from the input plug to the output plug without being changed. In this case, you can only use the output plug if the input plug is connected to an input data wire; connecting an output data wire to such an output plug without a connected input data wire will cause the output data wire to be "broken" (and colored gray).
Data wires carry specific types of data
Each data wire carries a specific type of data between blocks. For example, if a data wire is dragged from a logic plug on a block’s data hub, it can only be connected to a logic plug on another block’s data hub. The chart below shows what kind of data each plug can accept or send out.
Data wire colors
Data wires are identified with specific colors: wires carrying number data are colored yellow, wires carrying logic data are colored green, and wires carrying text data are colored orange.
"Broken" data wires
If you try to connect a data wire to a plug of the wrong data type, the data wire will be broken (and colored gray). You will not be able to download your program if a data wire is broken.
If you click a broken wire you can read why it is broken in the small help window in the lower right corner of the work area.
Data must be within the possible range of the plug
If an input data wire transmits a value outside the possible range of the plug it is connected to, the block will either ignore the value or change it to a value within its range. For plugs that allow just a few input values (example: just 0, 1, or 2), the plug will ignore the input if a value arrives outside its range.
For plugs that accept larger input ranges (example: 0 – 100), the plug will force any input outside its range to fit. For example, if a Move block’s Power plug receives an input value of 150, the block will change the input value to 100 (i.e., a number within the Power plug’s range).
This chart shows the different characteristics of the plugs on the Send Message block’s data hub:
| Plug | Data Type | Possible Range | What the Values Mean | This Plug is Ignored When... | |
| Connection | Number | 0 - 3 | Connection number to send to. Choosing "0" will send messages from slave NXT to master NXT. | ||
| Mailbox | Number | 1 - 10 | Receiver's mailbox to put message in | ||
| Text | Text | 58 character maximum | Message to send | Message Type not Text | |
| Number | Number | -2147483648 - 2147483647 | Message to send | Message Type not Number | |
| Logic | Logic | True/False | Message to send | Message Type not Logic |